Sunday, November 30, 2014

Grilled Shrimp Over Cheddar Grits with Pancetta and Shiitake Mushrooms


A fun combination which combines a great light and healthy grilled shrimp with some comfort food items for fall - the grits and pancetta.  Flavorful, easy and quick this meal will take less than 45 minutes from preparation to plating and everyone will enjoy the wonder aroma and flavors that each part adds to a beautiful meal.

Grilled Shrimp Over Cheddar Grits with 

Pancetta and Shiitake Mushrooms

For the Cheddar Grits

2 cups whole milk
2 cups water
1 cup cornmeal (fine ground is best)
2 Tablespoons chopped chives (optional)
1/4 cup butter, chopped
1/2 lb white cheddar cheese, grated *

Combine the whole milk and water in a sauce pan and bring to a boil.  Slowly add the cornmeal in a steady stream and reduce to a simmer while whisking the cornmeal into the liquid.  Cover but continue to whisk and mix up the grits so they so not clump every 3-5 minutes.  Cook approximately 20-25 minutes until slightly thickened.  Add cheddar cheese until melted and incorporated then stir in the butter.  Add chives if using.  Serve immediately.

*You can use a sharp yellow cheddar cheese if you are not able to find a white cheddar. 

For the Shrimp

6-8 colossal shrimp (about 3-4 per person or about 3/4 pound total for two people)
1/3 cup extra virgin olive oil
1/4 - 1/2 tsp paprika (smoked paprika preferred for this one)
1/4 tsp cayenne pepper (use more if you like a spicier kick)
1/2 lemon juiced
1-2 garlic cloves, minced (or dried granulated garlic, approximately 1tsp)
salt and pepper

Combine all ingredients in large zip lock bag.  Add shrimp and marinate 30 minutes or maximum of 1 hour.  Grill shrimp on outdoor grill or grill pan on medium-high heat for approximately 3-4 minutes per side until opaque.  Remove and serve immediately.

Pancetta and Mushroom Confit

3 slices of pancetta, sliced about 1/4 inch thick then cut into cubes
6-8 oz shiitake mushrooms, sliced into strips

In a nonstick pan cook the pancetta until starting to brown.  Add the mushroom strip and cook approximately 2 minutes longer until mushroom have softened but still maintain their firmness.

Spoon the grits onto a plate.  Arrange cooked shrimp in the center and sprinkle with pancetta and mushrooms.  Serve immediately.

Tuesday, November 25, 2014

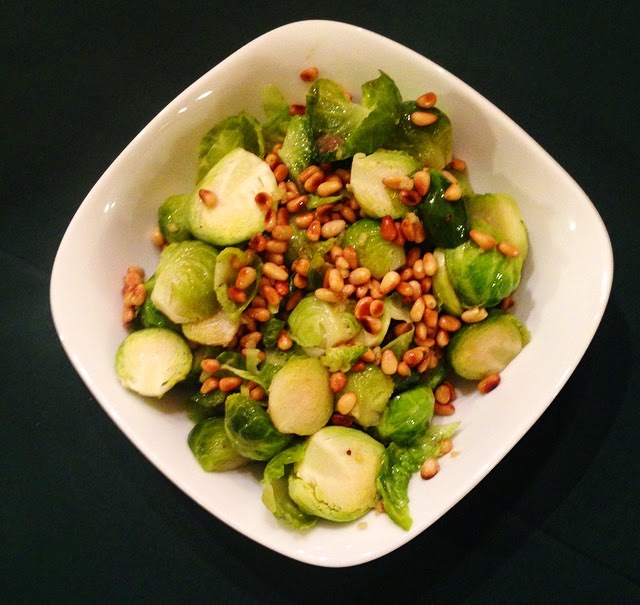
Braised Brussel Sprouts with Garlic and Pine Nuts


A delicious, simple and quick side dish, this is absolutely delicious.  A great colorful complement to your family dinner or holiday gatherings.  The optional addition of a few celery leaves or a 3 inch piece of celery helps eliminate any bitter flavor from the brussel sprouts.

Braised Brussel Sprouts with Garlic and Pine Nuts

1 lb brussel sprouts
3/4 cup chicken stock
1 3-inch piece of celery (or a piece of the inner heart of the celery with leaves), optional
1/2 tsp salt
1 2oz package (approximately 1/4 cup) pine nuts
2 Tbsp extra virgin olive oil
2-3 cloves garlic minced

Wash brussel sprouts and trim hard ends off then divide in half, top to tail.  Place in a shallow pot so there is enough room for the brussel sprouts to lay in one even layer.  Add chicken stock and sprinkle with salt.  Add celery if using.  Cover with lid loosely.  Bring to boil then reduce heat to low, cover and simmer approximately 6-8 minutes until soft when pierced with a knife.  Most if not all the liquid should have evaporated.  

While the brussel sprouts are cooking, in a small nonstick pan over medium-high heat toast the pine nuts until well browned.  Stir constantly to keep from burning.  These will color fairly quick.  Remove from pan to cool slightly, set aside.

In the same pan used for the pine nuts, add 2 Tbsp olive oil and saute garlic about 1 minute until softened and pungent garlic smell disappates.  Remove from heat.  

Place brussel sprouts in a serving bowl (or you can serve directly from the pot if you are plating in the kitchen), pour the garlic and olive oil over the brussel sprouts and toss with or top with the pine nuts.  Serve immediately.


Thursday, November 20, 2014

Caramelized Shaved Brussel Sprouts


This puts a whole new twist on the famed brussel sprout.  Whether or not you are a brussel sprout fan you will LOVE these once you taste them.  The cooking process takes away the bitterness that the sprouts are known for while the caramelization process adds to the savory flavor and aroma of the dish.  Optional pancetta makes a great complement as a garnish or mixed in but is purely optional to whatever suits your taste.

Caramelized Shaved Brussel Sprouts

1 medium Vidalia onion, or other sweet varietal, finely chopped (or 3-4 shallots chopped)
2 lbs brussel sprouts, finely chopped
2-3 cloves garlic, minced
3-4 Tbsp olive oil
2-3 slices pancetta, sliced approximately 1/4-1/2 inch thick (optional)

If using the pancetta, dice into cubes.  In a non-stick pan over medium to medium-high heat, cook the pancetta until fat is rendered and pancetta sears.  Remove from heat and drain on paper towel.  Set aside.

In a large saute pan, add 3-4 Tbsp olive oil over medium-high heat.  Add onion (or shallots) and cook approximately 5 minutes until translucent.  Continue to sweat the onions over medium heat while you add the garlic.  Cook, stirring, for approximately 30 seconds more then add the brussel sprouts.  Saute, stirring for about 3-5 minutes then turn the heat on your stove to the lowest setting.  Cover the sprouts with wax paper and cover the pan with a lid.

NOTE:  FROM HERE ON COOKING TIMES WILL VARY BASED ON YOUR STOVE.  IT IS BEST TO DO THIS BY LOOK RATHER THAN EXACT TIMING.  SOME BASIC TIMING HAS BEEN INCLUDED TO HELP GUIDE YOU.

Approximately 10-15 minutes into cooking, remove the lid and paper and check the brussel sprout mixture.  They should start to show signs of caramelizing on the side of pan and those at the bottom.  Be careful not to burn them.  Stir them around then replace the paper and lid and continue to cook, checking periodically and stirring.  The closer the dish comes to finishing the less time between stirring and checking to keep from burning.  In the end you will have a nicely browned and caramelized concoction as pictured above.  At this point it easily reheats on the stovetop.   If using pancetta, no need to reheat.  You may mix it into the brussel sprout mixture at this point or sprinkle over the top as a garnish.  Serve warm.

Sausage, Apple and Cranberry Stuffing


Let's be honest.  The best thing about Thanksgiving is the side dishes.  And the one side dish that reigns supreme is stuffing.  We always make sure to leave some special room on our plates for this delectable side dish.  The sweetness of the apples and cranberries play nicely with the traditional savory flavors of the stuffing.  The Italian sausage adds a nice boost of flavor.   This stuffing is sure to be a hit this holiday season.


Sausage, Apple and Cranberry Stuffing


Ingredients:
8 cups (about 1 loaf) white bread, diced into cubes
1 pound mild or sweet Italian sausage, removed from casing
1 cup celery, diced
1 sweet onion, diced
2 Granny Smith apples, peeled, cored and diced
2 cloves garlic, minced
1 bay leaf
4 tsp. poultry seasoning
2 tsp. fresh sage, minced
1-2 cups chicken stock
1 cup dried cranberries (Craisins)
1/3 cup chopped Italian parsley
3 eggs
1/2 cup milk
salt and pepper to taste

1.  Preheat oven to 350 degrees.  Dice bread into cubes and divide evenly onto two baking sheets.  Bake until slightly dry, about 10-15 minutes.  Let cool completely.  Transfer into a large mixing bowl

2.  Sauté sausage in a heavy, large skillet over medium-high heat.  Using a wooden spoon crumble sausage coarsely.  Cook for about 10 minutes or until sausage is cooked thoroughly and starts to brown.  Using a slotted spoon, transfer sausage to a bowl reserving drippings in skillet.  Add a tablespoon of butter to skillet.  Add celery, onions, apples, and garlic to skillet and sauté until they start to soften (about 8-12 minutes).  Add poultry seasoning and bay leaf and stir until well combined.  Add dried cranberries and sage and stir until well combined.  Add sausage to mixture and continue to cook for about 5 minutes.  Remove bay leaf.  Mix in 1-2 cups of breadcrumbs into skillet.  Combine skillet mixture with the rest of the breadcrumbs in a large mixing bowl.  Add parsley.

3. Beat eggs and milk together.  Pour eggs and milk mixture over stuffing and toss until well combined.  Ladle chicken stock over stuffing a little at a time (you may not need to use all of the chicken stock).  Your stuffing should be moist but not mushy.  (Up until this point you can make the stuffing 24 hours in advance.  Just store in refrigerator in a sealed container.  Take out of refrigerator 30 minutes-1 hour before baking.)

4.  Once ready to bake, preheat oven to 375 degrees.  Put stuffing in a 2 quart - 3 quart baking dish.  Put about 6 slices of butter on top of stuffing.  Bake uncovered for 45 minutes or until top has become nicely browned and stuffing is heated through.

Monday, November 17, 2014

Sweet Potato Souffle


This is a wonderful and simple way to make sweet potatoes (or yams) light and fluffy with a lot of delicious flavor that will have everyone coming back for more.  The topping give a nice crispy finish without making the dish too sweet.  

Sweet Potato Souffle

4 Lbs yams (or sweet potato), peeled, cubed, and boiled until tender then whip them up
½ tsp salt
¼ tsp cinnamon
¼ tsp  nutmeg
½ - 1 cup butter
4 eggs
2 tsp vanilla
½ -1 cup sugar

Whip together above ingredients with an electric hand mixer.  Be sure to whip all ingredients except for eggs before adding the eggs to a mixture that is slightly cooled (room temperature or warm but bot hot to touch or eggs may scramble.  Place in casserole dish and top with following topping.

Topping:
¾ cup soft butter
¾ cup brown sugar
3 TBSP flour
½ cup chopped pecans
1 tsp cinnamon

Crumble and mix topping together and sprinkle on top of yams.  Bake for 40-45 minutes at 350 degrees until topping is light brown.

Thursday, November 13, 2014

Rustic Potatoes au Gratin


There is nothing better as the weather is starting to cool off than some creamy and cheesy potatoes au gratin.  This is a very easy recipe and one to keep in mind as the holidays are upon us.  These potatoes are sure to become a beloved side dish at your dinner table.


Rustic Potatoes au Gratin

Ingredients:

4 whole Russet Potatoes
1 large onion, diced
2 TBSP butter, softened
1 1/2 cups Heavy Cream
1/2 cup whole milk
2 (heaping) TBSP flour
3-4 cloves Garlic, finely minced
1 tsp. salt
Freshly ground pepper, to taste
1 1/2 cup sharp or mild cheddar cheese, grated (we like to combine a mixture of yellow and white cheddar cheese)


Preheat oven to 400 degrees

1.  Scrub and clean potatoes.  We are going to include the peels in this dish so there is no need to peel the potatoes.

2.  In a saute pan, combine diced onion with about 3 TBSP butter and sauté on medium to low heat until onions are a nice golden brown and caramelized (should take about 20 minutes).  Set aside and let cool.

3.  In a medium bowl, whisk heavy cream, whole milk, flour, garlic, salt and pepper until well combined and the mixture starts to thicken a little.

4.  Smear softened butter all over the bottom and sides of a baking dish (we usually use a 2.5 quart Corningware oval casserole baking dish).

5.  Slice potatoes (not too thin but not too thick), then cut the slices into fourths (if you would like smaller pieces slice into sixths).  Place 1/3 of the potatoes in the bottom of the baking dish.  Sprinkle 1/3 of caramelized onions over potatoes.  Pour 1/3 of the cream mixture over the potatoes and onions. (You can also sprinkle a little bit of cheese between the first two layers but make sure not to sprinkle cheese over the top layer until done baking). Repeat this two more times, ending with the cream mixture.  Cover with foil and bake in the oven for 30 minutes.  Remove the foil and continue baking for 30-40 minutes, or until the potatoes are a nice golden brown and cream mixture is bubbling.  Add grated cheese to the top of potatoes and bake for 5 minutes or until the cheese is melted and bubbly. 

6.  Allow potatoes to stand for a few minutes before serving.  

Tuesday, November 11, 2014

Pumpkin Cake with The Ultimate Whipped Cream Cheese Frosting

Long ago I was inspired from an ancient Betty Crocker recipe for pumpkin bars.  I developed this cake, as when making pumpkin risotto I always had leftover pumpkin.  The result was a fluffy moist cake with the light and delicious flavor of pumpkin and the best part is your house smells wonderful while it is baking and the resulting cake is even better than it smells!  The cream cheese frosting is a TRUE cream cheese frosting, not very sweet, but the flavors blend perfectly so you may enjoy every bite.

Pumpkin Cake with 

The Ultimate Whipped Cream Cheese Frosting


For the cake:

2 cups all purpose flour
2 tsp baking powder
2 tsp baking soda
1 tsp salt
2 tsp ground cinnamon
4 eggs, beaten
1/2 the contents of a 15-oz can of pumpkin (approximately)
1 cup vegetable oil
1 1/2 cup superfine sugar (regular sugar will work fine as well)
chopped walnuts for garnish (optional)
BVC's The Ultimate Whipped Cream Cheese Frosting (recipe also follows below on this recipe)
Preheat oven to 350 degrees.

In a 9x13 inch pyrex baking dish spray with Baking spray or lightly coat with cooking oil.

In on bowl combine flour, baking powder, baking soda, salt, and cinnamon.

In a separate larger bowl beat the four eggs and whisk in the pumpkin and vegetable oil then whisk in the sugar 1/2 cup at a time.  Once these ingredients are combined, slowly whisk into the egg mixture the dry ingredients until well combined.  Pour into the baking dish and bake for approximately 25-35 minutes until a wooden toothpick comes out clean.

Allow to cool before frosting.

For The Ultimate Cream Cheese Frosting:

2 x 8 oz packages cream cheese, softened
1/2 cup (1 stick) butter, softened
2 tsp vanilla extract
2 1/2 cups confectioners sugar, sifted

Cream together the cream cheese and butter until fluffy.  Add vanilla and beat in.  Slowly add in the sugar and continue beating until well combined and soft.  Spread over cooled cake.  Top with walnuts if desired.

The Ultimate Whipped Cream Cheese Frosting


The beauty of this frosting is that it is mild in sweetness balancing nicely to truly appreciate the simplicity of a soft and buttery cream cheese topping.  No single ingredient over powers the others; they work in perfect harmony to make the ultimate cream cheese frosting.  If you want a stiffer or sweeter frosting simply add more sugar, but it is absolutely perfect the way it is.  

The Ultimate Whipped Cream Cheese Frosting

2 x 8 oz packages cream cheese, softened
1/2 cup (1 stick) butter, softened
2 tsp vanilla extract
2 1/2 cups confectioners sugar, sifted

Cream together the cream cheese and butter until fluffy.  Add vanilla and beat in.  Slowly add in the sugar and continue beating until well combined and soft.  Spread over cooled cake.

Monday, November 10, 2014

Pumpkin Soup


The title of this soup does not do it justice.  It not just your typical pumpkin soup it is AMAZING pumpkin soup and super easy to make.  Elegant, delicious, and simple.

Pumpkin Soup


1 onion, chopped
2 1/2 cups butternut squash, chopped
3 Tbsp olive vegetable or canola oil
1 tsp cinnamon
3/4 tsp nutmeg
6 cups chicken broth
44 oz canned pumpkin puree*
1/4 cup Maple Syrup (Grade A preferred)
1 Tbsp grated ginger**
1/2 - 1 cup heavy cream, or more to taste - start with less and add more
salt and pepper to taste
Pumpkin seeds, optional
Sour Cream, optional

Heat oil and butter over medium heat in a large pot or dutch oven.  Saute onions and butternut squash until the onions and squash have softened but not browned, approximately 7-10 minutes.  Lower the heat and add the pumpkin puree and stir to combine.  Add in the chicken broth, maple syrup, cinnamon, nutmeg, and ginger.  Stir together then raise heat to high and bring to a boil.  Reduce to simmer for approximately 30 minutes, uncovered, stirring occasionally.

When the soup has finished simmering and the squash is fully softened, using an immersion blender blend until smooth.  You can also achieve the smooth texture by using a traditional blender and blending it in batches, but as the soup is very hot, remove the hole cover from the top of the lid and cover the hole and the lid with a towel to allow the steam to escape and the top will not blow off.  Return the blended soup to pot.  Season with salt and pepper and add cream.  Garnish with pumpkin seeds if desired.  Serve with a dollop of sour cream in each individual serving bowl if desired.  Serve hot.

*If you are using a brand such as Libby's that is full of color and flavor 44 oz is sufficient although you can add a bit more if you have any leftover from one of our other pumpkin recipes.  If you are using an organic brand such as Farmer's Market, they tend to have less flavor so add an additional 15 oz can to the soup.  Keep in mind the organic brands also tend to be much lighter in color.

**Grating ginger fresh is always the best option but can be a pain.  Some specialty stores, I know Gelson's Market in California, carries a brand by Christopher Ranch in the produce section.  It is the closest and awesome substitute to fresh ginger that I cannot tell the difference.  They also have organic options as well as other items such as crushed garlic, basil, etc.  They are small jars and need to be refrigerated

Thursday, November 6, 2014

Sweet Potato "Sliders"


A delicious twist on your traditional sweet potato side dish and they are easy to make for a small family meal or a large group.  Perfect for your holiday tables or as a fun and festive addition to your dinners at this time of year.

Sweet Potato "Sliders"


1 large sweet potato, cut on the round in 1/2 inch slices
1/4 tsp finely chopped walnuts, per round
1/8 tsp light brown sugar, per round
1 Tbsp butter
salt and pepper
1 Tbsp olive oil

Preheat oven to 400. 

Line a baking sheet with non-stick foil.

Brush front and back of each sweet potato with olive oil and place on baking sheet.  Salt and pepper each round.  Place a small mound of nuts on top of each round along with brown sugar then dot with small bits of butter.  Cover baking sheet with foil and bake for approximately 40 minutes then remove foil and broil until browned.

Sunday, November 2, 2014

Salmon Stuffed with Spinach and Marscarpone and a Panko Crust


 One of the great things about this recipe is it leaves you ready to make a nice accompany sauce for a the salmon or to put over pasta simply by dicing a shallot and garlic and sauteing; add some white wine, chicken stock and reduce; a bit of tomato paste then finish with your leftover marscarpone cheese and a bit of parmesan and you have a wonderful side sauce.  The fish is amazing on it's own and very simple with a big "wow factor".  A great end to the day for dinner.

 Salmon Stuffed with Spinach and Marscarpone 

and a Panko Crust


3/4 lb salmon fillet, thick center cut, boneless and skinless - you will slice this in half and create a "pocket" by slicing into the fattest part of the center piece on each, and slice through approximately 3/4 of the the way to leave the fillet intact on the on long edge as well as the sides

9 oz bag of spinach
4 oz marscarpone cheese, softened to room temperature
4 oz cream cheese, softened to room temperature (you can substitute and extra 4 oz of marscarpone in place of the cream cheese)
2 Tbsp chopped red onion (or 2 Tbsp freeze dried red onion from Lighthouse)
4 Tbsp butter, melted
1 cup panko
1 Tbsp dried Italian seasoning
4 Tbsp parmesan cheese

Bring a pot of water to boil and add the spinach until wilted, approximately 2 minutes.  Drain well and set aside until cool then wring out as much water as possible and chop finely.

In a mixing bowl, combine the chopped spinach with the marscarpone, cream cheese and red onion.  Fill this into the pockets that were sliced into the salmon steaks.  You can do this a few hours ahead of time and keep refrigerated.

Melt the butter and combine with the panko, Italian seasoning, and parmesan.

Place the stuffed salmon on non-stick aluminum foil on a baking sheet.  Press the panko mixture on top firmly.  Bake in preheated oven at 425 degrees for about 10-12 minutes until golden brown on top and salmon has cooked through.


Grilled Ginger Honey Baby Bok Choy


Delicious on its own it pair great with the BVC Broiled Ginger Honey Salmon.  The sweet of the ginger and honey complements the bitter of the vegetable while grilling gives a nice char and crisp texture to the dish.  A fantastic way to introduce a new variety of green into your meals.

Grilled Ginger Honey Baby Bok Choy


1 recipe* of marinade from BVC Broiled Ginger Honey Glazed Salmon
2 baby bok choy, sliced in half lengthwise

After boiling the marinade for approximately 5 minutes, baste the bok choy with some of the marinade.  On a preheated grill pan sprayed with high-heat grill spray, grill the bok choy, cut side down, until browned, approximately 5-7 minutes, then flip to finish cooking another 3-5 minutes.

Serve with additional scallions if desired.

*If making this side dish separate from the BVC Broiled Ginger Honey Salmon you may want to cut the marinade recipe for the marinade in half.

Broiled Ginger Honey Glazed Salmon


Nice and fresh and wonderful anytime of year, this salmon dish is fresh yet hearty and better yet it is quick and delicious!  For those who cannot use soy, use the soy substitute, such as Coconut Secret Coconut Aminos, to add the flavor.  Pairs wonderfully with the BVC Grilled Ginger Honey Baby Bok Choy as a simple side dish

Broiled Ginger Honey Glazed Salmon


1/2 cup olive oil
1/4 cup sesame oil
2 Tbsp rice vinegar
2 Tbsp low sodium soy sauce (can use soy substitute, ie Bragg Liquid Aminos if there is an allergy)
1 Tbsp fresh grated ginger
2-3 garlic cloves, minced
2 Tbsp toasted sesame seeds
2 Tbsp minced scallions
1/2 lime, juiced
1/4 cup honey
1 lb skinless boneless salmon
micro asian greens (or any micro green) - found in many specialty markets or some produce sections*
Grilled Ginger Honey Baby Bok Choy

Mix above ingredients and marinate salmon approximately 30 minutes.

Preheat oven to 425.  Bake salmon for approximately 10-15 minutes until cooked through.  Meanwhile, boil down the marinade until syrupy, stirring occasionally, and serve over the salmon with diced green onion and micro greens, if desired.

*Micro greens can sometimes be difficult to find.  They have a variety from micro asian green, micro arugula, micro broccoli, micro kale, micro basil, mixro mixed greens... the list goes on and on.  The only one I would NOT use with this is the micro basil.